1 Torch Research Workflows Documentation
1.1 Purpose
The aim of this library is to simplify the process of building, optimizing, testing and debugging deep learning models using PyTorch as well as providing implementations of some of the latest research papers. Extensibility is kept in mind so that it is easy to customize the framework for your particular needs.
Some key features of the framework:
Easy to use, flexible and extensible API to build simple & complex models with multiple inputs, outputs and tasks
Model debugging (e.g., activation statistics of each layer, gradient norm for each layer, embedding visualization)
Model understanding and result analysis (e.g., attention maps, confusion matrix, ROC curves, model comparisons, errors)
Support hyper-parameter optimization (random search, hyperband) and analysis
Architecture learning (DARTS & evolutionary algorithms)
Keep track of the results for retrospective analysis and model selection
1.2 Contents:
1.3 A tour of TRW using the MNIST dataset
1.3.1 MNIST dataset
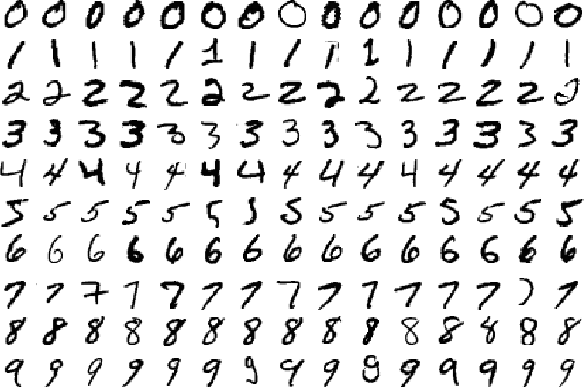
We will be using the MNIST classification task as an example to give an overview of the framework. The purpose of this task is to classify a 28x28 white and black image into one of the ten possible digits. We have access to 55,000 training images to train the model parameters, 5,000 images for validation to select the best hyper-parameters this task and 10,000 images to assess the model.
1.3.2 Specify and train the model
In this section we define a classification model, but first, let’s import commonly required modules:
import trw
import torch.nn as nn
import torch.nn.functional as F
import numpy as np
Using the native PyTorch API, we define our model. To specify that a node
should be used as a classification unit, we use the trw.train.OutputClassification.
By default it will use the multi-class cross entropy loss:
class Net(nn.Module):
        def __init__(self):
                super(Net, self).__init__()
                self.conv1 = nn.Conv2d(1, 20, 5, 2)
                self.fc1 = nn.Linear(20 * 6 * 6, 500)
                self.fc2 = nn.Linear(500, 10)
                self.relu_fc1 = nn.ReLU()
                self.relu_conv1 = nn.ReLU()

        def forward(self, batch):
                # a batch should be a dictionary of features
                x = batch['images'] / 255.0

                x = self.relu_conv1(self.conv1(x))
                x = F.max_pool2d(x, 2, 2)
                x = x.view(x.shape[0], -1)
                x = self.relu_fc1(self.fc1(x))
                x = self.fc2(x)

                # Here we create a softmax output that will use
                # the `targets` feature as classification target
                return {
                        'softmax': trw.train.OutputClassification(x, 'targets')
                }
Finally, we can create a trw.train.Trainer to start the training and evaluation:
# Configure and run the training/evaluation
options = trw.train.create_default_options(num_epochs=10)
trainer = trw.train.Trainer()

model, results = trainer.fit(
        options,
        inputs_fn=lambda: trw.datasets.create_mnist_datasset(),
        run_prefix='mnist_cnn',
        model_fn=lambda options: Net(),
        optimizers_fn=lambda datasets, model: trw.train.create_sgd_optimizers_fn(
                datasets=datasets, model=model, learning_rate=0.1))

# Calculate statistics of the final epoch
output = results['outputs']['mnist']['test']['softmax']
accuracy = float(np.sum(output['output'] == output['output_truth'])) / len(output['output_truth'])
assert accuracy >= 0.95
1.3.3 Evaluation of the model
By default TRW keeps track of useful information to check input inputa data, evaluate and debug the model. By default, the following folders will be created:
mnist_cnn_r0
├── random_samples
├── augmentations
├── tensorboard
├── history
├── lr_recorder
├── history
├── worst_samples_by_epoch
├── errors
| best_history.txt
| last.model
| last.model.result
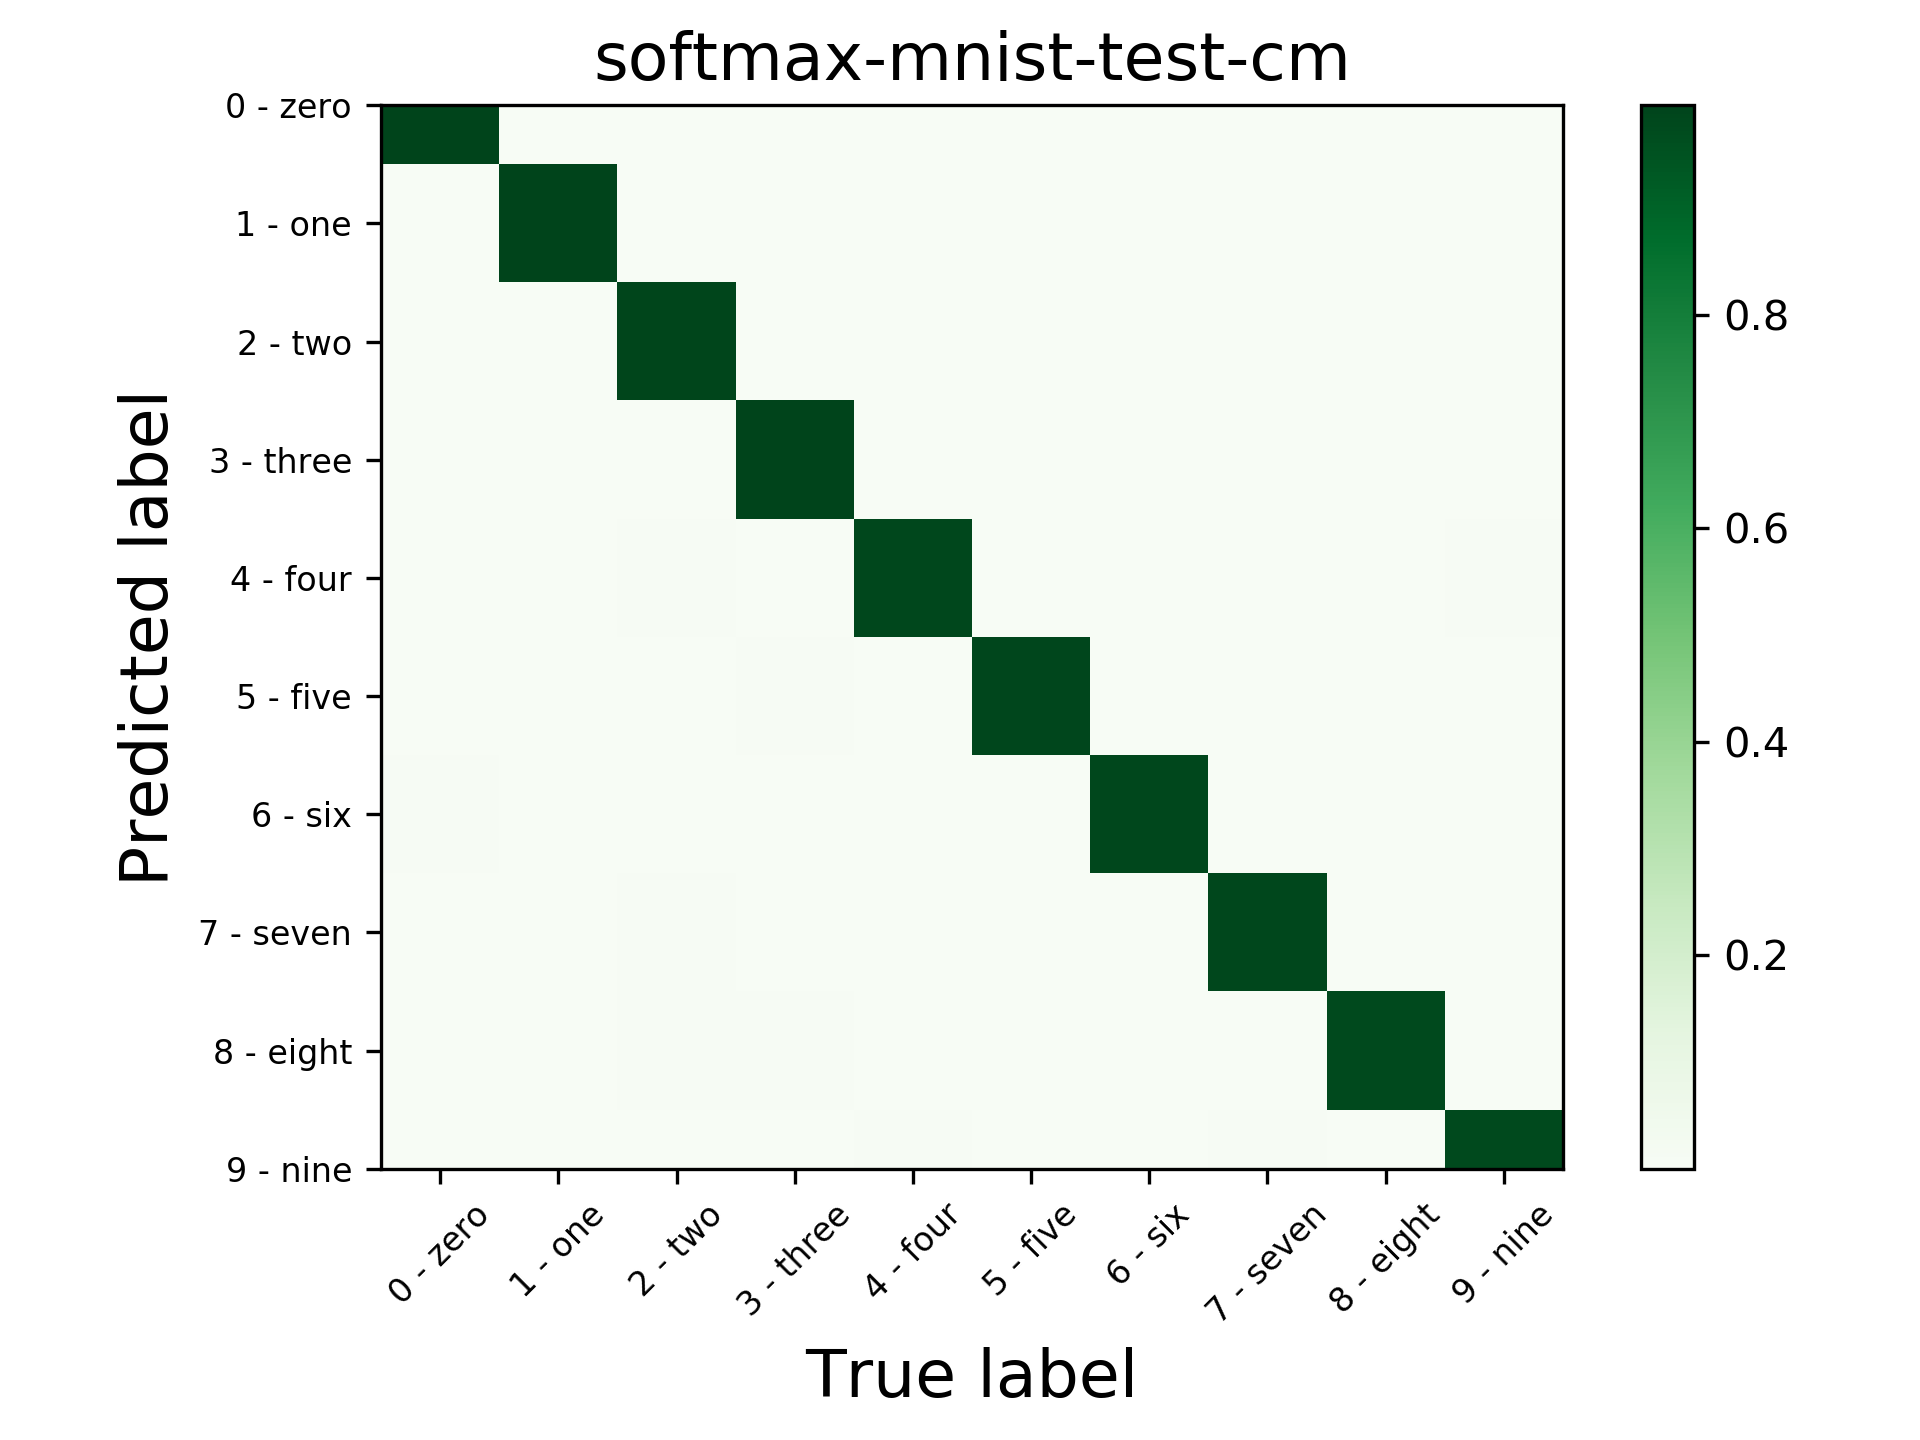
| softmax-mnist-test-cm.png
| softmax-mnist-test-report.txt
| softmax-mnist-train-cm.png
| softmax-mnist-train-report.txt
| trainer.txt
1.3.3.1 Inspecting the input data
The trw.train.Trainer will output random samples in mnist_cnn_r0/random_samples/mnist.
Features of a sample that can be natively exported in a meaningful format (e.g., .png for an image).
For example, mnist_test_s0_e0.png will be a random image from the test split:

Other metadata that cannot be exported to a known format will be summarized in a text file. For example, mnist_test_s0_e0.txt will store metadata such as sample ID, target class:
targets=5
sample_uid=6573
dataset_name=mnist
split_name=test
term_softmax_output=6
targets_str=5 - five
1.3.3.2 Inspecting the data augmentations
To make sure the data augmentation is behaving as expected, it is useful to visualize them. By default
augmentations will be stored in the mnist_cnn_r0/augmentations/mnist folder. Internally,
trw.train.SequenceArray will create a unique ID per sample that will be used to keep track
of the augmentations.
1.3.3.3 Basic Statistics
At the end of the training, meaningful statistics will be gathered:
ROC and AUC for binary classification,
Confusion matrix,
Accuracy, precision, recall, F1 score, most common errors,
Evolution of accuracy and losses during the training.
1.3.3.4 Example errors
Using the callback trw.train.CallbackWorstSamplesByEpoch, a selected number of
samples with errors will be exported. Another useful view is to display the errors by epoch
using trw.train.CallbackWorstSamplesByEpoch and inspect the samples that
are the most frequently classified and in particular in the training split. These are the
errors the classifier has the most difficulty assimilating and often reveal the outliers. Here
is an example below on the train split:

The samples are displayed on the x-axis (one per pixel) and y-axis shows the epochs. Red indicates a sample with high loss while yellow indicates samples with low loss. Samples are sorted by overall loss.
Here are the most difficult examples to classify. This can be used quickly identify outliers:

Examples of outliers and annotation mistakes in the original MNIST dataset
spotted using trw.train.CallbackWorstSamplesByEpoch callback.
1.3.3.5 Embedding analysis
trw.train.CallbackTensorboardEmbedding allows to export an intermediate tensor (or commonly referred to
as embedding) to the tensorboard embedding tab. This can be useful to understand what the model considers as similar
samples and possibly detect common trends.

Embedding of the MNIST dataset displayed using Tensorboard.
1.3.3.6 Hyper-parameter selection & visualization
Tuning hyper-parameters is one of the crucial steps to train a deep learning model. It is often what makes the difference
between a model that is average and one that is doing magic. The challenge whith hyper-parameters is that they will vary
wildly depending on the task or dataset. One of the most basic tool to optimize hyper-parameters is to use random search.
That is, we will repeat the training of a model a specified numbr of times with hyper-parameters randomly selected for each
training. TRW provides an easy mechanism to set up hyper-parameter optimization using
trw.hparams.HyperParametersOptimizerRandomSearchLocal
First, weed to set up the hyper-parameters:
def create_net(hparams):
        # create 2 model hyper-parameters
        number_hidden = hparams.create('number_hidden', trw.hparams.DiscreteIntegrer(500, 100, 1000))
        number_conv1_channels = hparams.create('number_conv1_channels', trw.hparams.DiscreteIntegrer(16, 4, 64))

        n = trw.simple_layers.Input([None, 1, 28, 28], 'images')
        n = trw.simple_layers.Conv2d(n, out_channels=number_conv1_channels, kernel_size=5, stride=2)
        n = trw.simple_layers.ReLU(n)
        n = trw.simple_layers.MaxPool2d(n, 2, 2)
        n = trw.simple_layers.Flatten(n)
        n = trw.simple_layers.Linear(n, number_hidden)
        n = trw.simple_layers.ReLU(n)
        n = trw.simple_layers.Linear(n, 10)
        n = trw.simple_layers.OutputClassification(n, output_name='softmax', classes_name='targets')
        return trw.simple_layers.compile_nn([n])
Then we need to specify how to evaluate the hyper-parameters:
def evaluate_hparams(hparams):
        learning_rate = hparams.create('learning_rate', trw.hparams.ContinuousUniform(0.1, 1e-5, 1.0))

        # disable most of the reporting so that we don't end up with
        # thousands of files that are not useful for hyper-parameter search
        trainer = trw.train.Trainer(
                callbacks_pre_training_fn=None,
                callbacks_post_training_fn=None,
                callbacks_per_epoch_fn=lambda: [trw.train.callback_epoch_summary.CallbackEpochSummary()])

        model, results = trainer.fit(
                options,
                inputs_fn=lambda: trw.datasets.create_mnist_datasset(normalize_0_1=True),
                run_prefix='run',
                model_fn=lambda options: create_net(hparams),
                optimizers_fn=lambda datasets, model: trw.train.create_sgd_optimizers_fn(datasets=datasets, model=model, learning_rate=learning_rate))

        hparam_loss = trw.train.to_value(results['outputs']['mnist']['test']['overall_loss']['loss'])
        hparam_infos = results['history']
        return hparam_loss, hparam_infos
Finally, run the parameter search and its analysis:
# configure and run the training/evaluation
options = trw.train.create_default_options(num_epochs=5)
hparams_root = os.path.join(options['workflow_options']['logging_directory'], 'mnist_cnn_hparams')
trw.train.utils.create_or_recreate_folder(hparams_root)
options['workflow_options']['logging_directory'] = hparams_root

# run the hyper-parameter search
random_search = trw.hparams.HyperParametersOptimizerRandomSearchLocal(
        evaluate_hparams_fn=evaluate_hparams,
        repeat=40)
random_search.optimize(hparams_root)

# finally analyse the run
hparams_report = os.path.join(hparams_root, 'report')
trw.hparams.analyse_hyperparameters(
        hprams_path_pattern=hparams_root + '\hparams-*.pkl',
        output_path=hparams_report)
This will perform 40 training with random parameters and outputs a report. We can use these trainings to estimate the importance of the hyper-parameters. It is an important indicator as often, many of the hyper-parameters have little influence on the model performance. This hyper-paramater weighting indicates which hyper-parameters we should focus the search on:
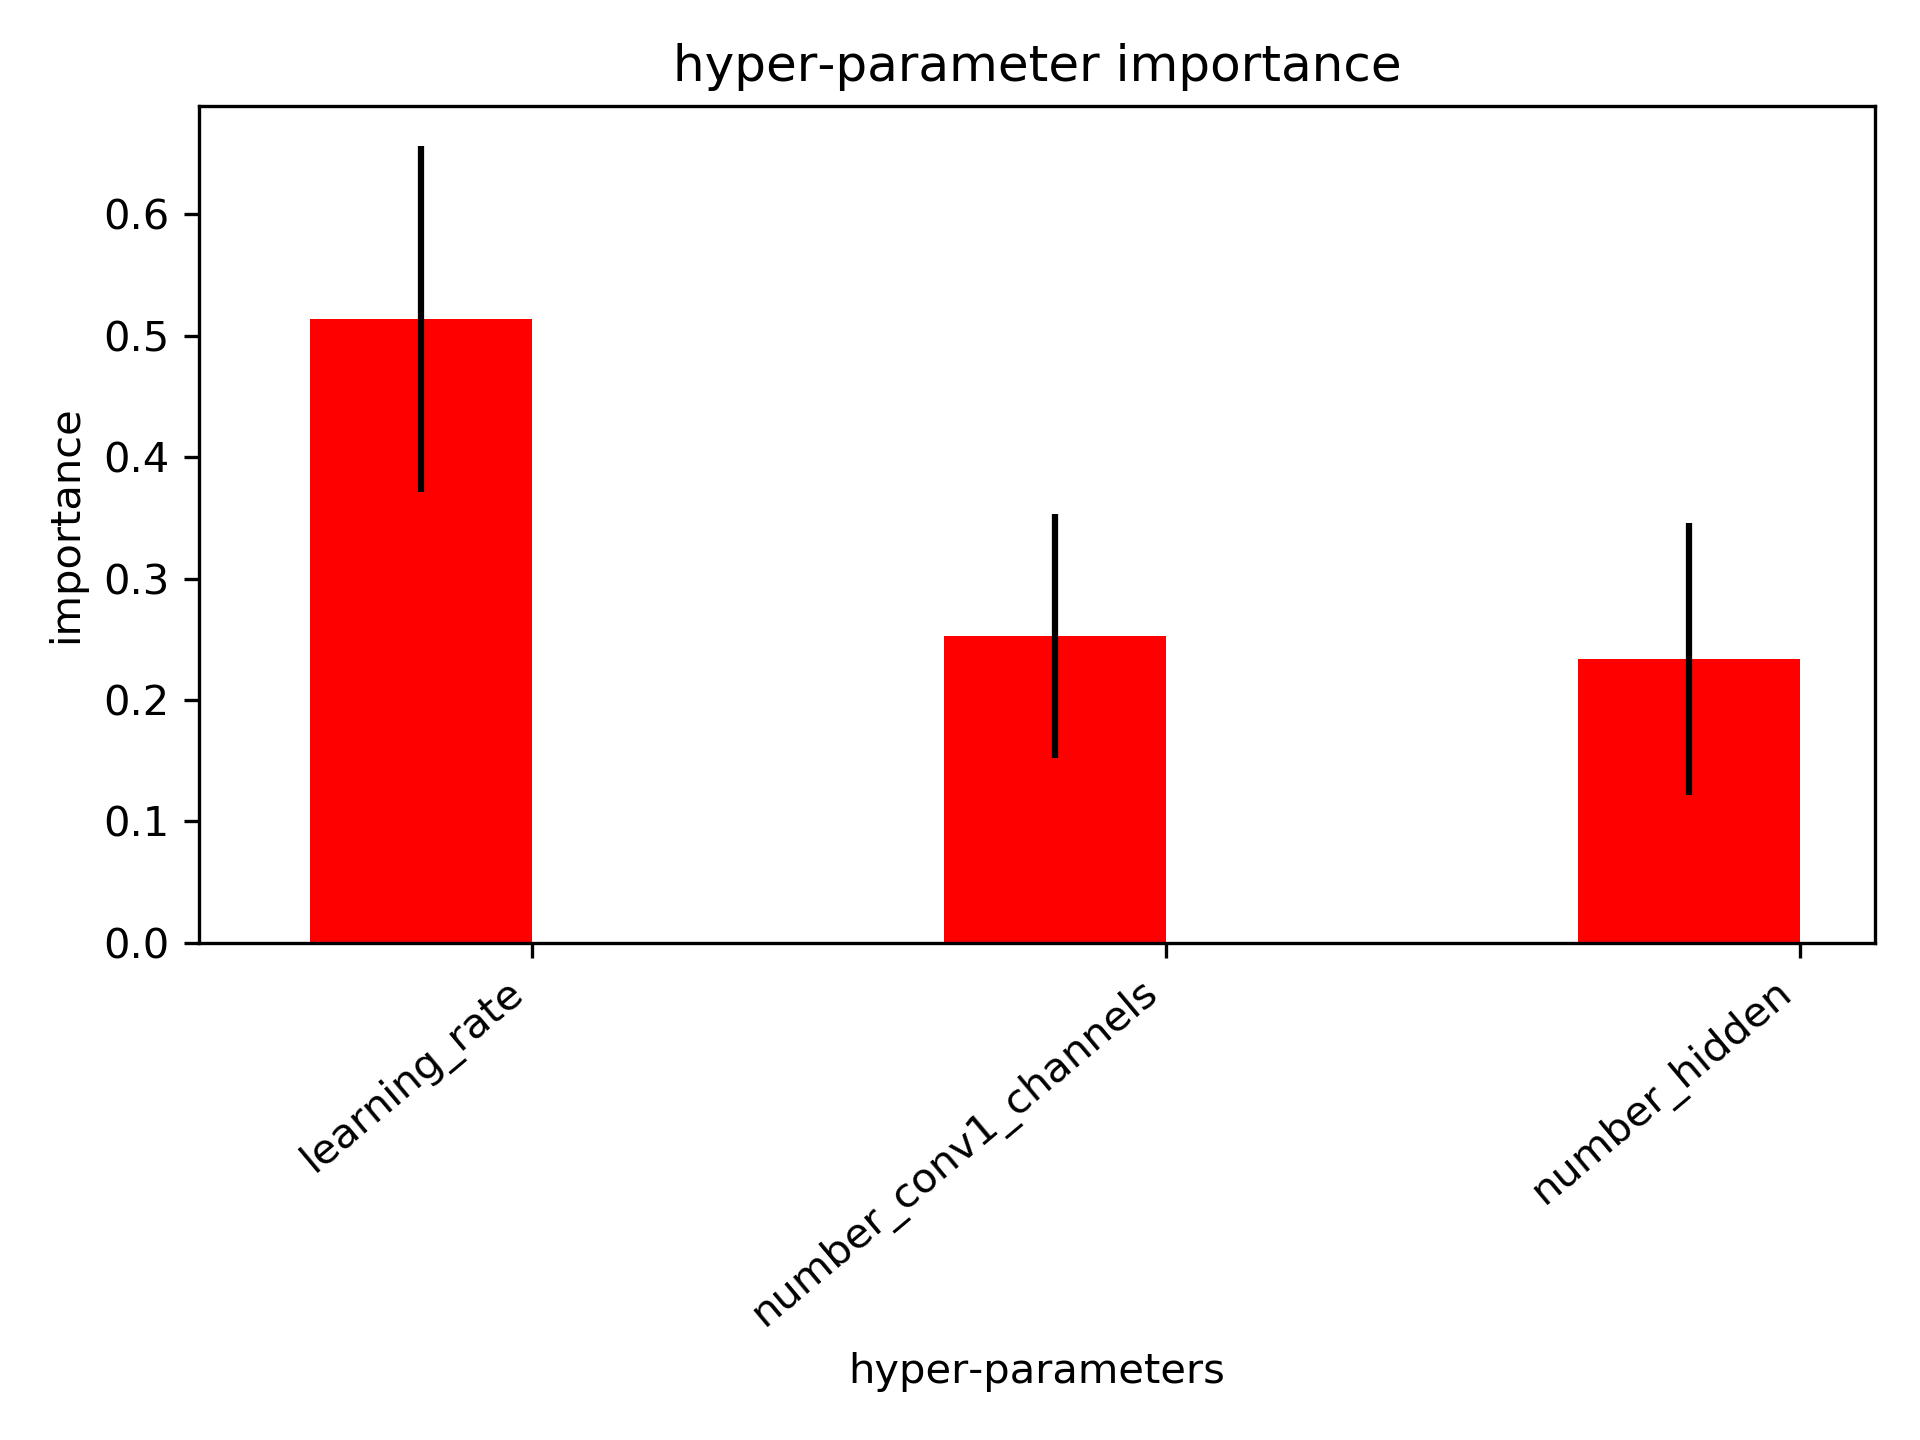
Hyper-parameter importance. This indicates the dominant hyper-parameters and allows us to discard the hyper-parameters that do not influence much the model
The hyper-parameters can be displayed relative to the loss and maybe we can gain additional insights:
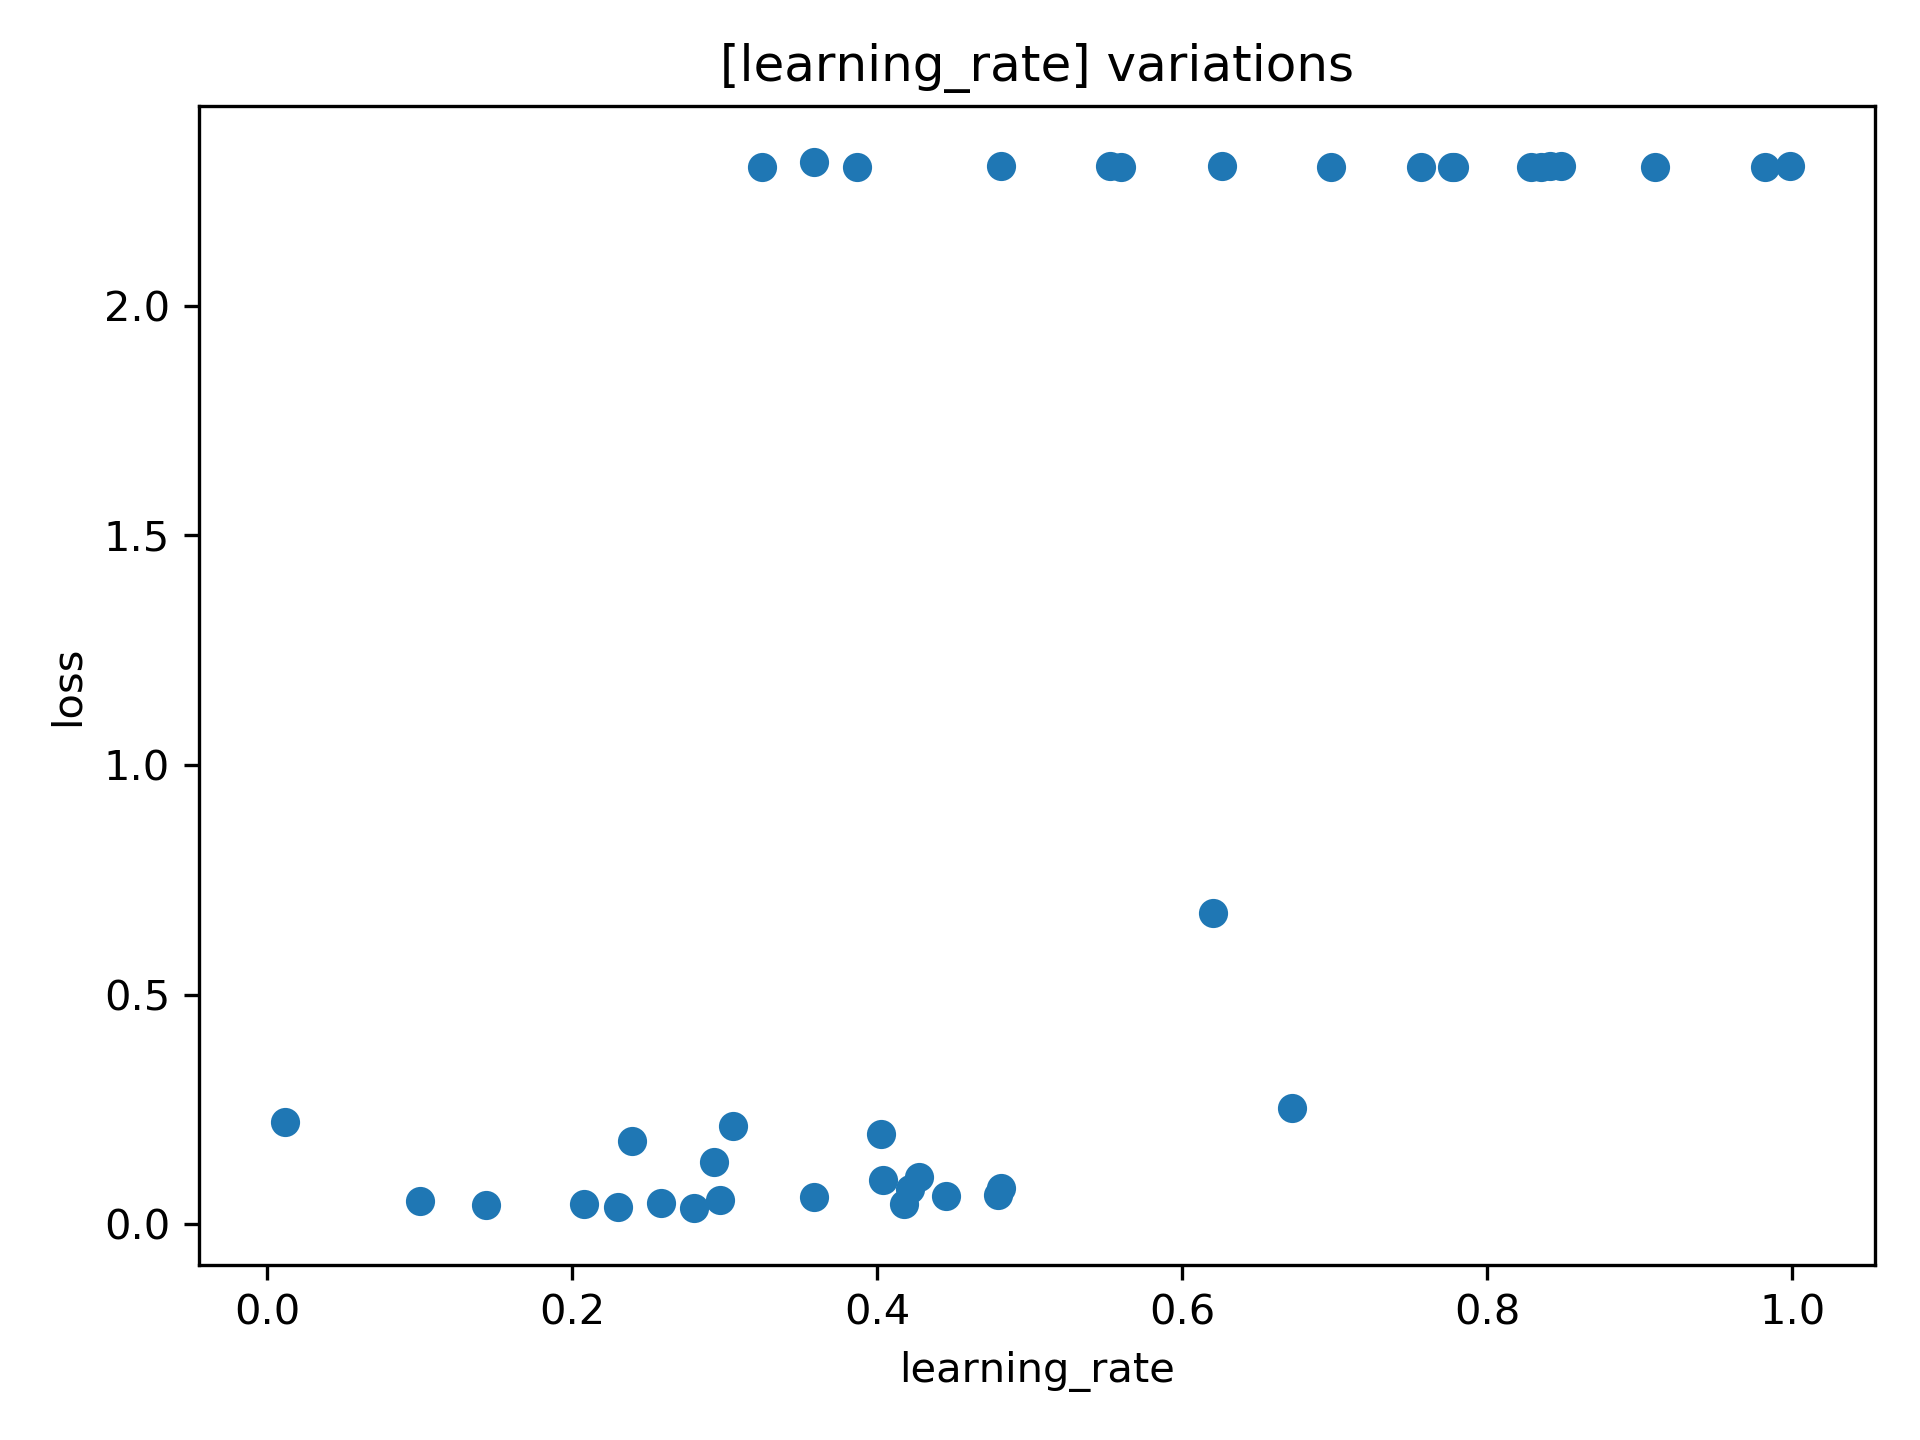
Here we can see that when the learning rate is set too high, the model more often performs poorly than with lower the learning rates.
Import parameters to optimize are learning rate, batch size or model parameters (e.g., activation function, number of convolutional filters, filter size, number of layers).
1.3.3.7 Archtecture search
TBD
1.3.3.8 Model Export
Finally, the model is stored as PyTorch model and exported to a onnx format. This allows interoperability between major deep learning frameworks (e.g., for production).
1.4 Simplified neural network declaration
1.4.1 Existing pain points with PyTorch
One of the pain point of the PyTorch API is that the user has to specifiy the exact shape of the layer. This leads to a snowball effect where changing one layer shape will affect the rest of the network. Making even a simple tweak can be labor intensive. In effect, it is difficult to conveniently chain operations. The following is a very simple network for the MNIST dataset to illustrate the problems:
class CNN(nn.Module):
        def __init__(self):
                super(CNN, self).__init__()

                # Pain point 1: we have to `declare` the layers
                # in a first stage. Then in `forward`, we need
                # to specify how to perform the calculation. This
                # is unnecessary and it complicates the code
                self.conv1 = nn.Sequential(
                        nn.Conv2d(
                                in_channels=1,              # Pain point 2: we have
                                out_channels=16,            # to keep track of the input
                                kernel_size=5,              # and output for each layer manually.
                                stride=1,                   # This is really cumbersome!
                                padding=2,
                        ),
                        nn.ReLU(),
                        nn.MaxPool2d(kernel_size=2),
                )
                self.conv2 = nn.Sequential(
                        nn.Conv2d(16, 32, 5, 1, 2),
                        nn.ReLU(),
                        nn.MaxPool2d(2),
                )
                self.out = nn.Linear(32 * 7 * 7, 10)

def forward(self, x):
        x = self.conv1(x)                   # Here we have to reuse the sub-networks
        x = self.conv2(x)                   # we declared earlier, making the code
        x = x.view(x.size(0), -1)           # more verbose than necessary
        output = self.out(x)
        return output, x
Dealing with more complex networks (e.g., multiple inputs and multiple outputs), render this situation even more cumbersome as we have to keep track of all the internal parameters and how to execute them in the forward method.
1.4.2 Solution: trw.simple_layers
Using trw.simple_layers, we can solve these two pain points
and make the declaration of a CNN very simple.
The following code is the equivalent of the previous network:
def create_net_and_execute(options, batch):
        # Declare the network: here we can easily chain the
        # operations and we avoid the snowball effect (i.e., the
        # the layer is not dependent on the previous layer parameters)
        n = trw.simple_layers.Input([None, 1, 28, 28], 'images')
        n = trw.simple_layers.Conv2d(n, out_channels=16, kernel_size=5)
        n = trw.simple_layers.ReLU(n)
        n = trw.simple_layers.MaxPool2d(n, 2)
        n = trw.simple_layers.Conv2d(n, out_channels=32, kernel_size=5)
        n = trw.simple_layers.ReLU(n)
        n = trw.simple_layers.MaxPool2d(n, 2)
        n = trw.simple_layers.ReLU(n)
        n = trw.simple_layers.Flatten(n)
        n = trw.simple_layers.Linear(n, 10)

        # Here we specify this node is a classification output and it requires
        # `targets` feature in the batch.
        n = trw.simple_layers.OutputClassification(n, output_name='softmax', classes_name='targets')

        # Optimmize the network so that the outputs can be
        # efficiently calculated
        compiled_nn = trw.simple_layers.compile_nn(output_nodes=[n])

        # Finally, calculate the outputs with some data
        outputs = compiled_nn(batch)
Now we can effortlessly chain sub-networks and easily add inputs and outputs as required. The code is also simpler to read.
1.5 Input pipeline
1.5.1 trw.train.SequenceArray
To fully utilize our GPU to train a deep learning model, it is required the data is efficiently processed and sent to the GPU. If the input pipeline is not optimized, the training will be unnecessarily time consuming and as such is a critical component to have set up appropriately.
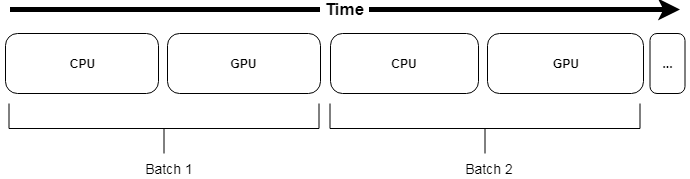
The simplest way to feed data to the GPU is to use trw.train.SequenceArray. This sequence assumes the data can be fully stored in RAM. This is also a relatively
fast way to feed the data since it is readily available. The only overhead being transfer of the data from RAM to the GPU.
Representation of a pipeline using trw.train.SequenceArray. CPU time mostly involve fetching the data from RAM and its transfer to the GPU
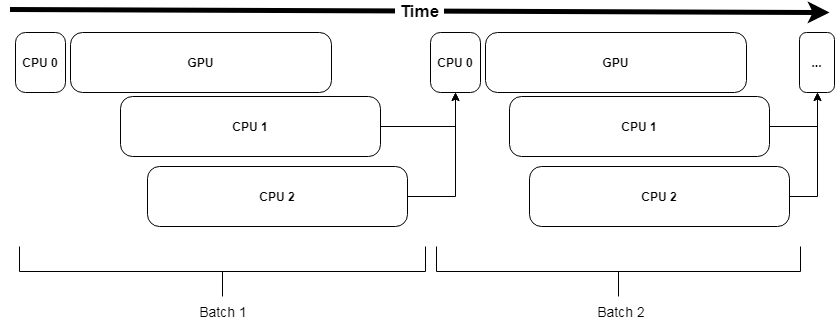
However, this is often not a realistic use case and in particular for deep learning models that often require large amount of data. Another requirement of a pipeline is to be able to perform efficiently data augmentation. Data augmentation may account for a significant processing time which will limit the GPU utilization.
Representation of a pipeline using trw.train.SequenceArray, with data augmentation. This is problematic since the augmentation may account for a large processing time, limiting the GPU utilization.
1.5.2 trw.train.SequenceMap
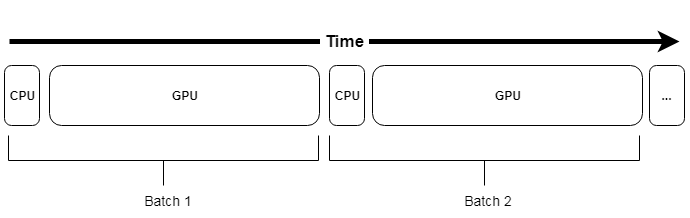
One way to make the data augmentation performant is to overlap the CPU (e.g., preprocessing & data augmentation) with the GPU (e.g., model training). This can be done using trw.train.SequenceMap,
which will use a pool of process workers to perform the processing (CPUn) while the main thread will orchestrate the background jobs.
Representation of a pipeline using trw.train.SequenceMap. CPU0 orchestrates the background processes CPU1 & CPU2 to perform the processing. In case the processing takes time, CPU0 will need to wait for the workers to have processed the next batch of data.
One potential issue with this method is the overhead required to orchestrate the background workers and more importantly, we will have to wait if the next batch of data is not ready. Finally, setting up the pipeline may not be straightforward as it depends on the specific configuration (GPU time, CPU time, number of CPU cores).
1.5.3 trw.train.SequenceAsyncReservoir
trw.train.SequenceMap will stall the pipeline in case the CPU is not fast enough to calculate the next batch of data. To avoid this problem, trw.train.SequenceAsyncReservoir uses a reservoir of
processed samples that can be directly sent to GPU even if the next batch is not available. In the background, process workers will process the data and fill the reservoir, slowly replacing the content
of the reservoir over time.
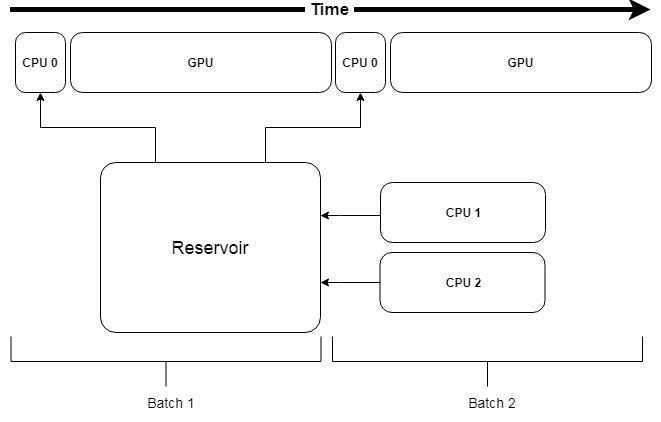
Representation of a pipeline using trw.train.SequenceAsyncReservoir. The data augmentation is performed by workers that will fill a reservoir. The next batch of data is sampled from the reservoir and avoid stalling the pipeline.
1.5.4 Examples of pipelines
1.6 Unbalanced data
1.6.1 Under-sampling
TBD
1.6.2 Sample weighting
TBD
1.6.3 Different loss function
TBD